Showing posts with label baby quilt. Show all posts

Thursday, March 10, 2016

Paperie SewTogether Bag

Today's Finish is my Paperie SewTogether Bag. 
Made with scraps from my Paperie
And, man, is it lurverly!!
I hand stitched around all of the red and orange heart shaped leaves from the Gathering Blooms Panel
Then matchstick quilted in Aurifil Seafoam(2835), Light Pink(2423), and Off White(2021) all across the front panel. I only use Aurifil when I sew, and it works like a dream in my Pfaff, Janome and vintage Singer.
When you're constructing your Sewtogether Bag, and you want to add a fancy outside, be sure to cut your pieces extra long and wide, as you will embellish them Before you trim them and sew the bag together. If you begin with sides cut to the correct finished size, your bag will probably shrink and be smaller on the outside than it should be. So cut large and trim down, later!
On the other side, I used scraps of my favorite quotes from Amy's wonderful Paperie fabric, Quoted. So marvelous!! Then I fit in bits of the leftover scraps that were less than 2.5 inches, because I could not bear to lose them and wanted to see them every day. 
And the Answer to the Question, of course!!
I used Eponine as the outside sides, and Manuscript as the binding... I can see owning yards and yards of this marvelous print! 
I used a felt heart as my needle rest :)
And lined each zipper opening in velvet ribbon, with zippers to match. I placed the ribbon lower on the mint zipper pocket, to underline the wonderful quotes that Amy chose to use. Sigh!! Happiness!
The pocket interiors are Kona solids that sing with the Paperie line. The back lining is Happily Ever After, and the inside sides are Cosette. Find the entire line shown with names, here
The bottom is a section of the Gathering Blooms Panel, I added this to the pattern as I wanted extra space at the top of my bag, over the zippers, in case I needed to put a 4"square cutting template or other large object into the bag for safe keeping while I travelled to and fro.
Sweetness!!
Go and grab some Paperie as fast as you can!! It's limited edition and when it's gone, it's gone!! 
That Happily Ever After heart print comes in wide for backings, too!! Drool!!

And as if knowing that all of this lovely is out in the world, wasn't enough, my sponsor, Calico Cat Fabrics, has some very nice sales going on for you!!
I kid you not, she has Tula Pink Plum Ship Shape on sale for $3.69 a half yard. Sheer lunacy!!
Tanya has also just gotten entire ranges of novelty prints, so if a Dr Who Sewtogether Bag needs to be in your future, or a Sewing Themed bag, or Campers  (I mean, Campers!! So cute!!!), or Disney, hop on over and check her out!  All of her Riley Blake and Lecien are on sale until they're GONE!!

So Much Fun!!!
Moose slip on the ice, too ;)


XX!
Lori

Linking up with Crazy Mom Quilts for Finish it up Friday :) 

Thursday, September 24, 2015

SewPsyched! Quilt Auction for Charity! Plus Quilt

SewPsyched! CareAlong

It's time for another SewPsyched! CareAlong, where you bid on a hand made piece, and half of the proceeds go to a Charity or Person of your choice!! Last year, we raised $400 for Charities all across America! 

WOO!
This year, I am auctioning off my marvelous Being Charming Is A Plus Quilt.
This lap quilt measures 58 1/2" x 46" and is a bright bundle of wrinkly goodness!!
I used all Aurifil 50 wt cotton thread in the construction and quilting of this lap quilt. She is so soft!!
I used all Kona Cottons Solid fabrics in this Plus quilt. They are already so soft after only one wash, but because they are broadcloth, they will wear like iron and keep their colors bright, so your favorite recipient will have this little quilt FOREVER!
I love this little quilt so much, that I almost can't bear to part with her.
My Husband may never forgive me for sending her on!
I mean, just check out that wrinkly goodness!!
I quilted her with Wonky lines and outlined the Pluses, so that she is as interesting from the back, as she is from the front...
 The backing is Kona Cotton in Chartreuse. This picture does not do it justice. It is a vibrant, fun color!
The Being Charming Is A Plus Quilt is bound with Ombre grey fabric, so that she shimmers around the edges like a charming folk do :) I used Lynne Goldworthy's method of binding, so that she can take a lot of dragging or hanging around. 

Now, don't you think you  need this quilt for your favorite Math Teacher, littlest Kiddo or that favored Man in your life??? 

How It Works:
  • You bid on the quilt on Instagram, on Facebook, or by emailing me. I will be updating all three avenues, continually.
  • Opening bid is USD $150.00 This is how much it cost me to make the quilt, not including time and love :)
  • Winning bid is notified via the avenue through which you bid (Instagram, Facebook, email)
  • You pay SewPsyched! through Paypal.
  •  You choose your charity, and I will Paypal them the proceeds, immediately. I also forward you the receipt. 


Bidding begins
October 2, 2015

8 am Alaska Time
12 Noon Eastern Time
10 am Central Time
9 am Pacific Time
5 pm in the UK and the EU,
and
2 am FRIDAY October 3 in Melbourne

If you purchase this Being Charming Is A Plus Quilt, and are from outside of the USA, I will pay HALF of your shipping costs. Because I so appreciate folks who want to give back to others!

Let's get out there and do some good in the World!!

Last year's recipients were:

Catholic Charities
Seeing Eye Dog Program
Ovarian Cancer Research
Bat Research
Breast Cancer Research
Shelters for Abused Women and Children 
and an individual's entire stash for a year!!

See ya FRIDAY, OCTOBER 2!!

XOXOXO!!
Lori


Oh my Gosh!! I could snuggle up and take a nap, right now!!!!
Soooo soft!

Linking up with the ever Fabulous
Finish it up Friday :)

Wednesday, August 12, 2015

Bee-utiful Summer!

I just know that you've been dying to know what we've been up to here in the Landenburger household! 
Well, hold your hats, cause I'm gonna tell ya! 


We had a bumper crop of baby birds raised in the yard (or the back 40, as I call it). 8 species in total!!

True story: The violet green swallows nested in our nesting box for the first time, and they must have been youngsters themselves, because they only had one chick. Well, you can imagine that that chick was stuffed full of all of the amazing variety of mosquitoes and other flying goodies from the yard and across the street in the Chugach State Park... so much so that...


He GOT STUCK!!!

I kid you not! He spent an entire day wedged in the opening, trying to get out. Naturally, his parents continued to stuff him chock full of more insects, which I am certain didn't help the situation one bit. The next morning he was gone, flown the coop so to speak :) S/he and her parents are winging their way to southern California, where my son will see them arrive, soon.  If he sees an amazing pudge shaped missile flop by, we'll all know who it is!!! ;0

Speaking of The Kid, he is doing well as a production engineer and making chain mail in his spare time. It's fun to talk to him about patterns and making, especially as he is working in 'hard' materials and I mostly work in soft (sometimes in the head, admittedly!) Thanks for askin'! It's so nice when they get old enough that you can tone down on the worry and stand back and do more admiring :)

I'm still working away on the Being Charming is a Plus charity quilt... I want the quilting to be so good that the recipients will love it, and so that it will last forever. 
This is Anita's version. Don't you LOVE it?!! 

We have two varieties of bees in the garden. Native Bumble bees, and imported honey bees. The native bumble bees, come in three sizes... Very small and round and cute, Medium sized and red-rumped, and truly Ginormous!!! Bumble Bumble Bumble!! I admit to quoting from Rudolph the Red Nosed Reindeer, fairly frequently when I see them... Bumbles Bounce!! They never seem to mind:) 

The neighbors, however, think I'm crazy.


Have you tried licorice mint? It tastes just like licorice!! Fun!!

My lavendar is blooming, and they just love it! They also love the blooms on the licorice mint, I wonder what it is about the purple that attracts them so?

My Carnolian bees have filled the entire bottom of the hive with honey, and have filled and capped half of each of four smaller frames... in two weeks I am going to steal their honey away... don't tell them! 
For now, they are going crazy over my cilantro, which is blooming, and the going to seed arugula. I wonder if the honey will taste faintly of herbs?? The cilantro flowers taste just like cilantro, and are so pretty on a plate, and the arugula is very peppery!! I'll let you know how it tastes this Fall, when it starts to rain, and I have a yen for some honey on scones or popovers. I wish you could come and try it with me!!! You just stop on by, anytime!

It's the time of year to be canning and putting away. I've been a tad bit jealous of all of the raspberry delights I've seen folks making over on IG... next year I am Definitely putting in raspberry bushes!!! How did that get away from me? You keep me to it, you hear?
Crow berries in Arctic Valley. They throng the earth in the Quintillions. They taste of Spring; high and light and sweet.

I've filled one section of the freezer with kale from our containers, and I'll keep cutting and freezing it until I can't stand it anymore. Then a moose will wander by and eat it, and save me from the Kale Reign of Terror. Honestly!! EVERY YEAR!! What was I thinking??? It never ENDS. KALE KALE KALE!!!

But later this winter, when I am making kale and chorizo bean soup, I'll be mightily glad of the bounty. I'll smile, and yum, while I eat my steaming bowl of hearty goodness and gaze out upon the white winter vistas. Complacent that I am warm inside, while it is blustering and cold, out there.


It's only once in a Blue Moon that you get a summer like this!! Testing out my
camera skillz...

I hope you are having a lovely summer!!! What has been your most cherished moment? Ours has been spending Slow time together. Such a treat!!


The Blue Moon over Flat Top, behind the house. It was One in the 
morning, and that moon had it bright as day, outside :)

XX!
Lori

Linking up with:

And

And


Tuesday, July 28, 2015

WIP Wednesday! Rainbow Goodness!

Man oh Man! There is A LOT of excitement going on over here at SewPsyched!! 
A tidbit of my Being Charming is a Plus quilt, to whet your appetites!!
Here it is pre-assembly...
Made entirely with Kona Cotton Solids. Greys and black from a Silent Film layer cake, and Charm centers from a Kona Summer Colors Charm Pack. The Plus arms are from an Elizabeth Hartman design roll. 
I am quilting it with a wonky rainbow of lines in Aurifil 50 wt threads. This is just the beginning.... There will be a Lot more color!

What FUN! 

This quilt will last forever!! The Kona cottons are broadcloth, the batting is Warm and Natural 100% cotton, and the backing is a surprise! Ha! 
But you will love it :)

When this quilt is finished, I will auction it off in the SewPsyched! Care Along II. 

Woo!!

I prefer to have Care Alongs, rather than straight up sales, when selling my own makes, because, Hey, why not make the World a better place and give some family a lovey at the same time??

This Care Along II will auction this lap sized quilt, with 50% of the proceeds, after shipping, going to the winner's charity or person of their choice. 
In my last Care Along I, the winners chose various charities, and one chose an individual, to receive half of the proceeds. How nice is that?! I love it when folks want to make the world a better place!

When it is finished, I will put notices up on a Finish It Up Friday, and over on IG. I'm thinking of running the auction over there, as it is easier for more people to see where their bid stands. What do you think? Would you rather see it here, on the blog? 

I am SO looking forward to telling you other fun and exciting news that is coming up!
But, you'll have to wait, for now ;)

XX!
Have a Marvelous Day!
Lori

Linking up with 

And,

And

Tuesday, May 12, 2015

Oakshott Scandinavia Blog Hop 'On The Wings Of Love' !

Welcome to the Oakshott Scandinavia Blog Hop!! I am so glad you stopped by! 
Oakshotts are shot cottons and therefore have cream warp and a luscious color weft. Because of this special weave, they are particularly luxurious, and have a rich deep sheen. They also wear like iron, so are worthy of your heirloom makes!
Today's tutorial is for my crib quilt, On The Wings Of Love, a sweet breezy baby quilt to lighten your heart, and your day!
I chose to design a quilt that emphasized the negative space in the quilt, and the luxury of the cream Bergen, while giving the colors of the other wonderful Scandinavian fabrics, place to shine.
I wish you could feel how soft and squishy it is! 
When I think of Scandinavian design, I think of bright, light, breezy interiors, and simple curved lines so evocative of Nature and Purity.  So I made you this quilt for your little round cheeked bouncing baby. It has everything you need...
Messages of Love to wing your cherub to their dreams,

And luscious soft colors to wrap them in comfort.
The back is pure Scandi in soft grey and soft white,
  With a grid to guide their way home from their Nighttime adventures,
Sweet Dreams Little Ones!!

Tutorial
Materials
Fabric:
Oakshott Scandinavia
1 1/2 yard 01 Bergen (vanilla creme)
1 yard 08 Stockholm (dark grey)

 Fat Eights in:
02 Copenhagen (green)
03 Tromso (pink)
04 Helsinki (grellow)
05 Malmo (blue)
06 Oslo (purple)
07 Uppsala (light grey)

Thread:
Aurifil 2021 (cream) in 50wt for piecing and quilting

Other Materials:
fabric glue stick
card stock
painters tape
Quilting ruler and rotary cutter, pins, iron and ironing surface.

Preparation:
Iron all fabrics
Print and cut out templates. Glue to cardstock, and cut out heavy template. 
Place painters tape on the back of templates to provide a non-slip grip surface. 
Cutting:
Cut fabric using templates;
A -Cut  2 Helsinki, plus 1 all other colors
B -Cut 8 Bergen 
Background;
Cut 10, 7 1/2" squares of Bergen
Corner Stones (4);
Cut 2, 5 3/4" squares of Bergen. Cut in half on the diagonal


Setting Triangles (10);
Cut 3, 111/8" squares of Bergen. Cut into quarters, diagonally. (There will be 2 extra).

Border;
65", Cut 4, 2" strips. Join diagonally. 

Assemble Blocks:
Sewing;
3 Pin Method;
1. Fold all block components in half and finger press to mark the center of the block
   -press B ws together
   -press A rs together

2. Nest centers of A and B together. Pin at center mark. 

3. Match beginning of A and B, pin.


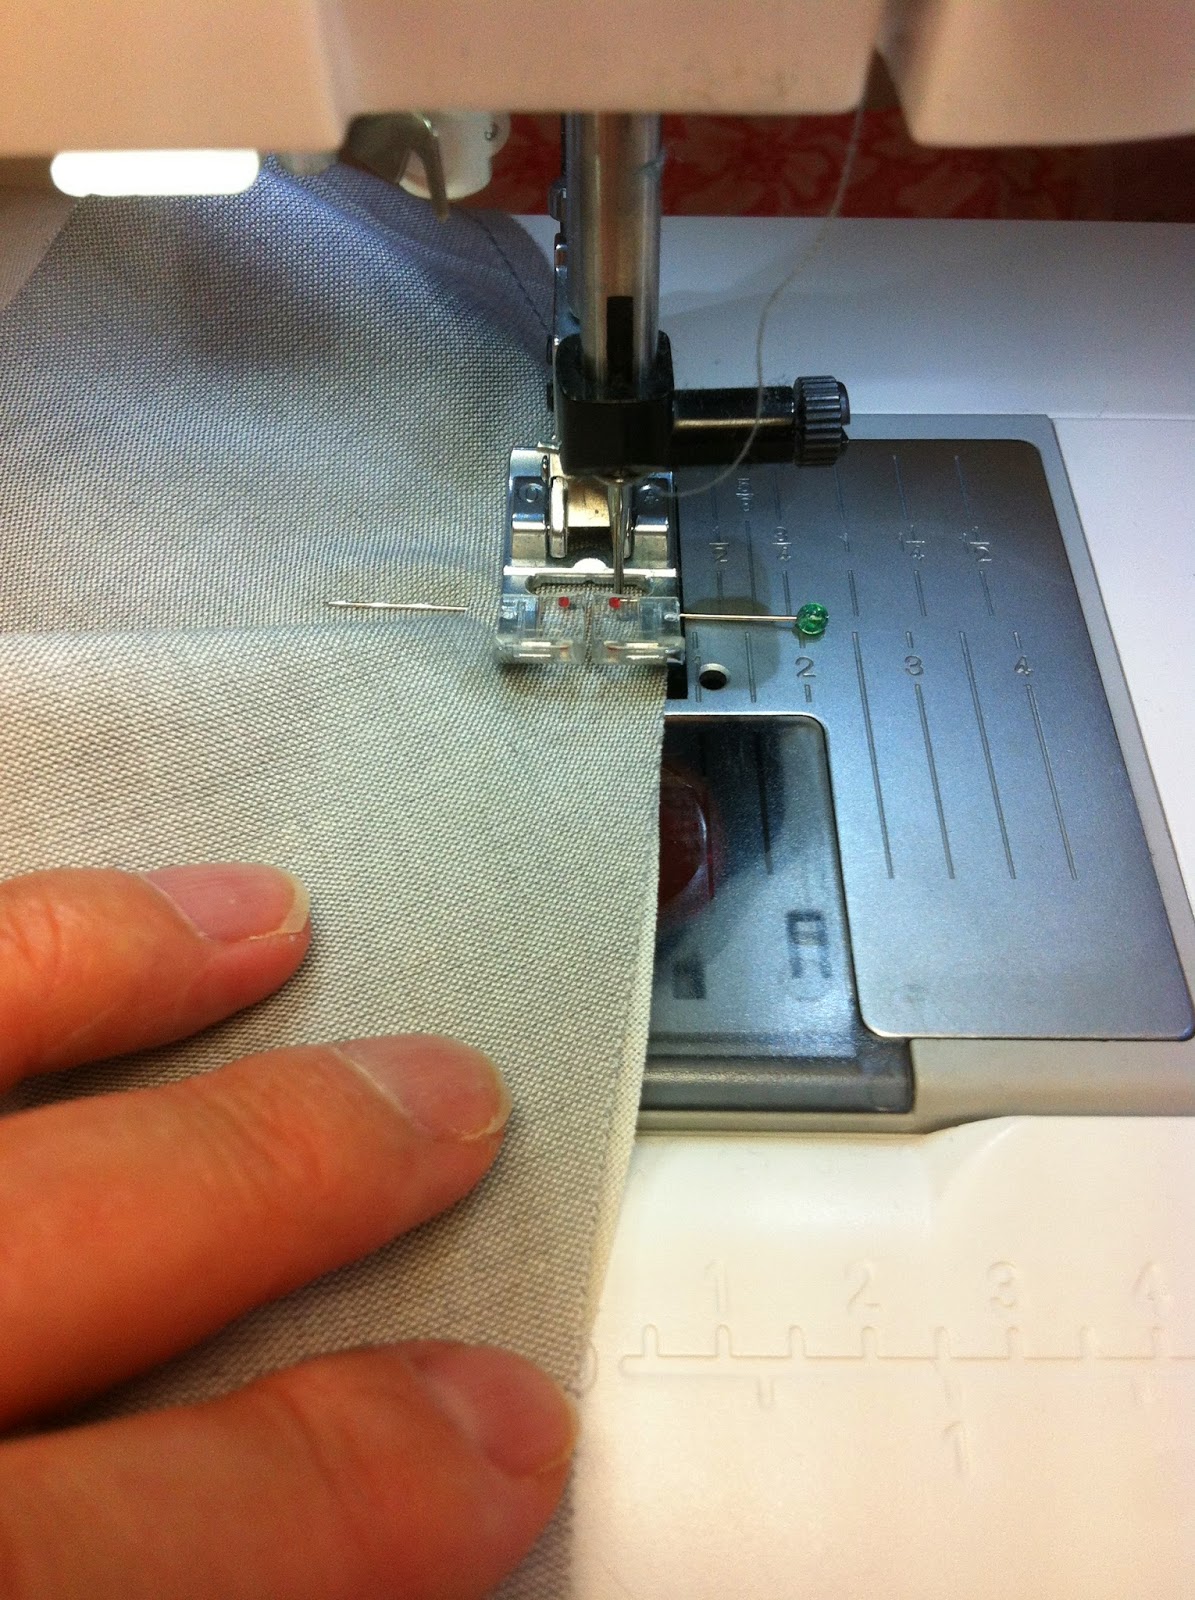
4. Set needle to scant 1/4" seam
5. Set stitch length to 3.0 or one setting above your regular stitch
6. Needle down, and pull/hold needle and bobbin threads during your first few stitches so that your block doesn't get sucked down into your machine
I did not sew over that pin :)
7. Using your fingers to keep the fabric edge together, pull curve straighter, sew slowly along edge up to center pin, do not remove pin,


8. Place last pin at end of curve, making sure that the outside edges are even

9. Remove center pin. Sew slowly, fingers keeping fabric edges meeting as you go, pulling gently

Just before the end, pull up on the center of the upper fabric to align edge and keep from getting a tuck in your seam.
Continue sewing to pin, remove pin, sew to end. Wahoo! First curved seams!!
10. Press all seams towards the dark fabric (away from background). Do not swish your iron in an arc!!! Just press straight down in parallel lines,
Place blocks while hot under a heavy book for super flat blocks! 
11. Trim blocks to 7 1/2" x 7 1/2" 

Assemble Quilt:
See Layout chart for guidance on block placement
1. Layout your blocks in your desired order 

2. Pin in diagonal rows

3. Sew rows. Add cornerstones to each corner. Sew

4. Press seams in each row in opposite directions from each other
5. Nest seams of first two rows, pin. Sew. 


Repeat for all rows. Press
6. Trim if necessary
7. Sew all rows together to form quilt top, nesting seams and pinning as you go. Press
7. Add borders to sides, Press. Add borders to bottom, Press.

Quilting the Quilt:


TIPS for quilting quilts with inset designs:
1. Use spray baste. 505 Spray baste is safe for babies, four legged or two legged. It will wash completely out in the laundry. It will also keep you from getting gathers on the underside of your quilt as you work.
2. Use a 90/14 needle. Increase your stitch length. 
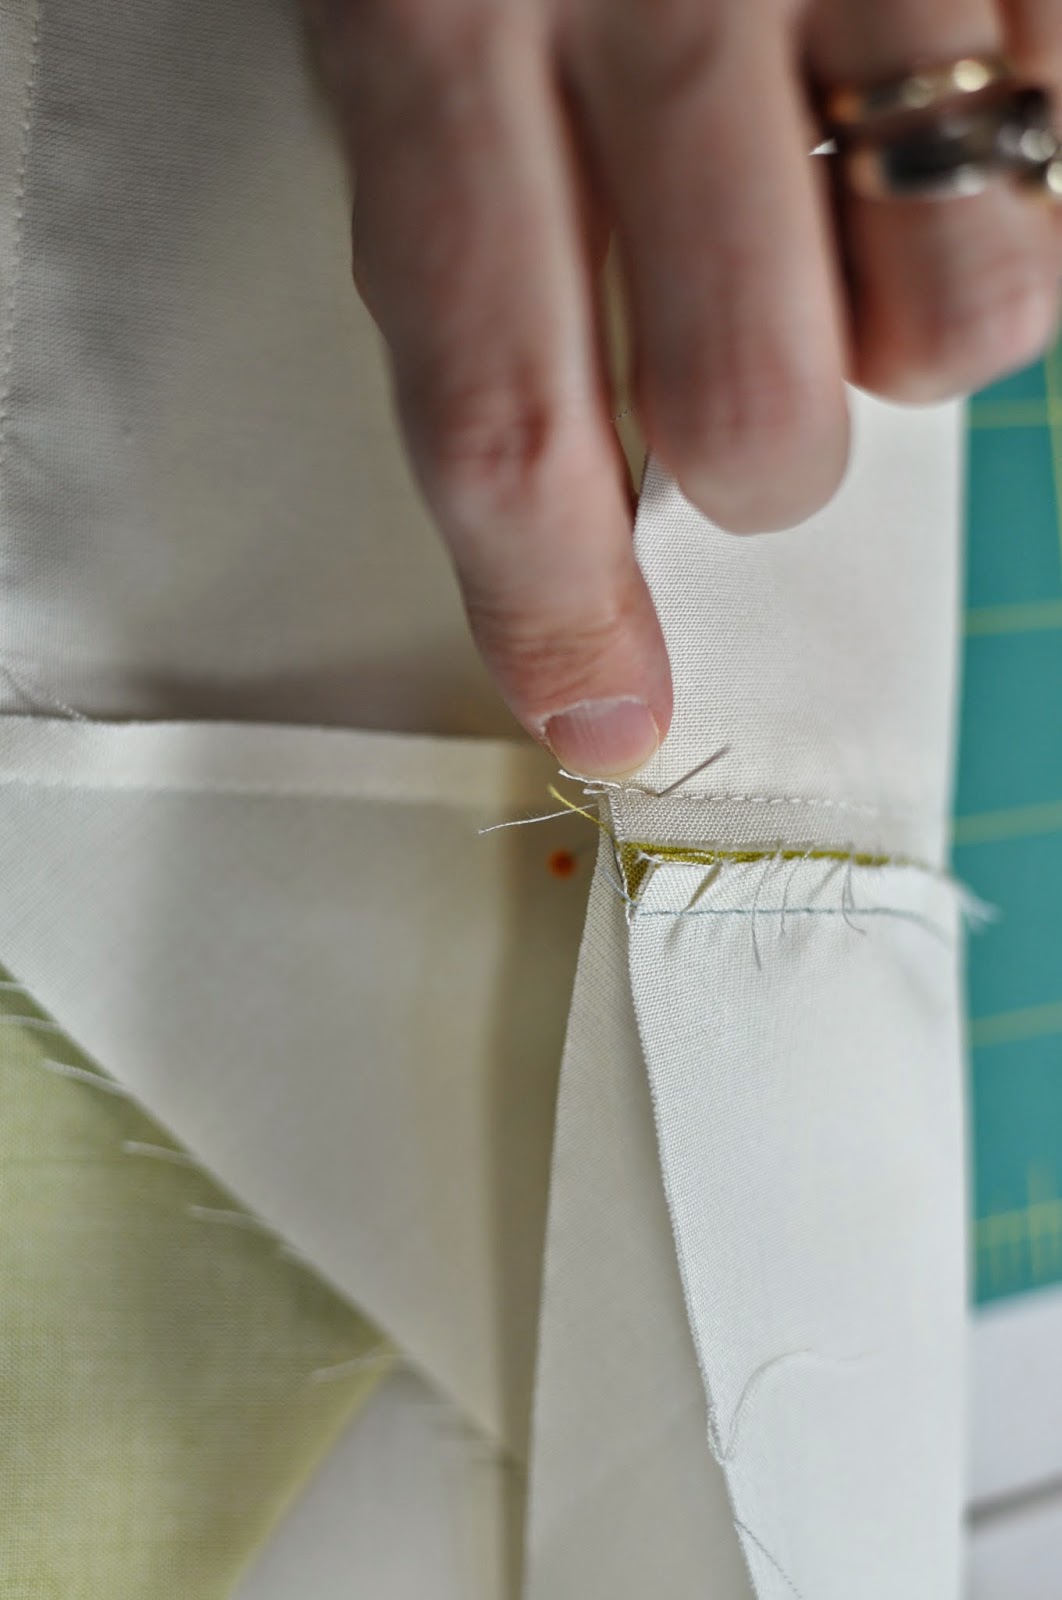
3. Work from the center, out. I machine embroidered the center Love motifs. The pattern can be found here. Do these first.
4. Then quilt your grids. I left two sections with only diagonal lines to add more interest. I'm not sure you can even see them in the final quilt ;) When you are quilting the grid, begin at the center motifs and work towards the edges of the quilt. You can mark your grid with chalk, or if your quilt is nice and square, you can do as I did, and work section by section. 
TIP - I used wool batting because it drapes so nicely and is warm but light. If you use wool batting be sure you cannot see the backing through it! Also, it will be fluffier when you are quilting, than cotton, so set your stitch length to 3.5 or more when going in one direction, and then to 4.0 or the next step up when finishing the grid in the opposite direction. This will keep you from getting puckers. Just say no to puckers!!
5. Man, you are going to love seeing that grid happen! It's so cool!! Gloves with sticky dots (machine quilting gloves) will help you to hold the fabric while it moves through your machine.
6. Do NOT stretch the quilt while you are feeding it under your needle! When you release it, it will bounce back into place and cause you to have strange eddies in your work. Ack! Just say no to eddies!!
7. Relax! Take breaks! Don't eat chocolate or drink tea while you're quilting...  HeHe ask me how I know;)

Binding:
1. Trim the quilt back and batting even with the outer edge of the borders. Make sure they're straight! Sew 1/8" from edge all around the quilt to stabilize the edge and keep it from puffing up anywhere.
2. Cut 4, 2 1/4" strips of 08 Stockholm. Make one long strip by attaching them on the diagonal. 
3. Fold in half along length, press. 
4. Using a scant 1/4" seam, sew binding to back of quilt, raw edges together.  Here is an excellent resource for remembering how to join the ends of the binding together on the diagonal when you get to the end. Easy!! 
5. Go to the ironing board. Fold the binding up and press straight up from sewing line.
6. Wrap binding around to front of quilt and press and clip in place. See Lynne Goldworthy's blog, Lily's Quilts for several excellent tutorials/tips on binding quilts. 
7. Using a binding or edge stitching foot, stitch the binding to the front of the quilt. Don't forget to label your beautiful work!!

Here are the Layout Diagram and pdf Templates for this pattern. 
Have a blast making it!! 
A million thanks to Michael and Lynne for sharing these truly delicious fabrics with me :)
We'd love love love to see your finished works! Post them on the Oakshott Blog, Shotthrough.

Don't forget to follow the Oakshott Scandinavia Blog Hop!

Sarah Fielke (I know!!!!) 5/12

So lovely to meet you!
XX!
Lori