You read it here, first, folks! I've actually made a garment!!
Meet the Dottie Angel Frock - Tunic Length!
I'll give you a short run down of what I did, as a newbie garment sewist and the World's Slowest Quilter, and link to other tutorials along the way.
I'll give you a short run down of what I did, as a newbie garment sewist and the World's Slowest Quilter, and link to other tutorials along the way.

I hope you find this review useful! If there is anything more that I can do, like make three more to be sure of my tute, I'd be glad to help as much as I can;0
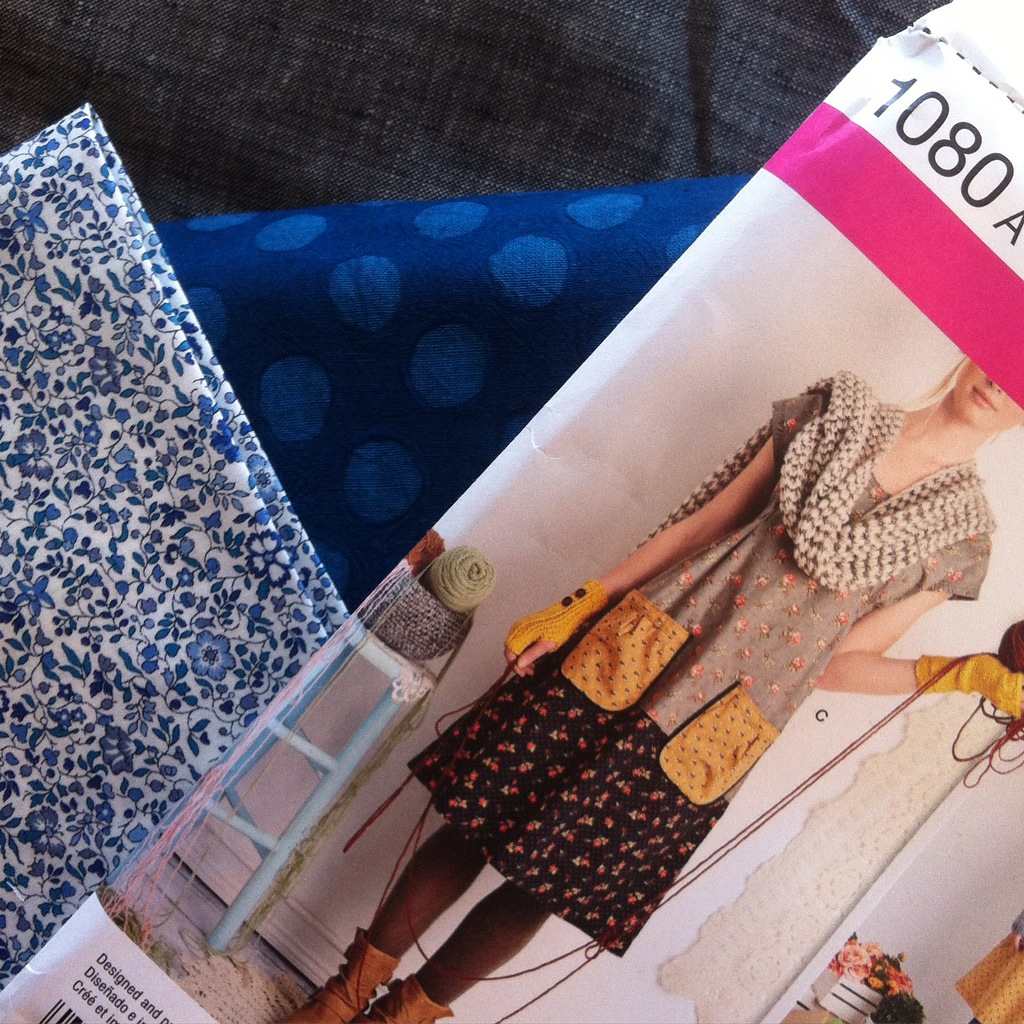
Materials:
Blue dot linen for body
Fat 8th of Liberty Tana Lawn for the pockets
Fat 8th of linen for pocket linings
I figured linen would give me the slouchy look I wanted, and quite honestly fit in with my ethic of Never Ever Again ironing clothing to wear.
Let's start from the beginning:
Step 1: Measure yourself. Be honest here... no fudging on the waist/hips/bust. Now is not the time for solemnly swearing that you will stick to that diet and start going to the gym every day, so the garment will fit perfectly at some future imagined date. Measure honestly, with a flexible tape. Here are tutorials on how to do that.
Professor Pincushion (video)
Step 2: Cut out your pattern. Now, if you're like me and have never sewn a garment, let alone one from this designer, you will be faced with a plethora of choices of sizes, and three styles, from which to choose.
- For the Dottie Angel Frock, I would suggest going up at least one bust measurement IF you are going to do as I did, and make longer darts. For instance, I cut the 38 1/2" bust size Small (8-10), although I'm a 36. It fits EXACTLY right, with no wiggle room, in the bust and under the arms, because of the two darts. I'm moderately cushioned under the arms, so you should choose based on your bust size, and on how much extra room you will need for movement. The back of the dress is very roomy, which does give you more leeway.
- Honestly, I still wasn't sure, so I cut out the pattern piece I thought would be right, and held it up to me very carefully, matching the finished shoulder seam with the seam on the shirt I was wearing, and pinching the pleats... This will give you a very rough estimate of fit, and definitely tell you if the size you have chosen is too small. This is a good beginner pattern in this way, because as an A-line dress/tunic, it is very forgiving as to body part coverage.
- You're supposed to use pattern weights, instead of pins, to secure the pattern pieces while you cut them out... But you know that the only kind of weights I've got in the house are Pie weights, and they roll all over. Sigh! So, if you do not have any weighting mechanisms, such as vintage ashtrays, the cat or clean and empty tea mugs, pin in this manner: Begin at the top, and smooth as you proceed to pin from left to right and left to right, down the pattern piece. Be sure there are no lumps!! Place the pattern pieces in accordance with the instructions.
- CUT INSIDE THE LINE, when cutting your fabric/pattern piece. Why? Because that's the way professionals do it, and it will give all of your future garments better fit. Here's the person who says so: Fashion Incubator A fascinating read into why you should cut accurately, and how to do so.
Step 3: Mark your fabric

- I have grey and white chalk, water soluble pens, and wax pencils, to use to mark objects in the Work Room... I chose to use a grey wax pencil because I couldn't find the 52000 white wax pencils I have somewhere, and because it would show well against the dark fabric and not wipe off or smear.
- Here is a great tutorial all about marking patterns. Who knew??!! Professor Pincushion I apologize for the annoying 3 second ad.
- Mark the Tucks. Measure the length of the dotted line, and draw a line on your fabric, or pin to mark this length... I used pins, and increased my darts by 2" longer at the bottom, as I wanted a more fitted look.
- Mark the fabric at the dot as this is where you will center your tie, later.


- Mark the Pockets.
- Do you know the Pin Method of marking a pattern?? Put a straight pin through the pattern piece Dot mark, and mark the fabric with a pencil or other marking device, where the pin touches it, as it comes out of the back of the pattern piece. Brilliant!!


- Mark the Fold line and the beginning of the sleeve from the side (at the dot, see below)
(See below in Sew section for more about sewing the sleeves)

- Mark ALL of the tabs and the pocket placements!

Step 4: Begin to sew!
Follow the steps in the excellent instructions.
I changed the pockets because I wanted to line them to help my Tana Lawn be more sturdy so I could put my phone in my pocket, and because I didn't feel like making the top band for the pocket.
Sew the Pockets
- Weight/pin and cut out the outer and lining pieces for two pockets, following the layout diagram in the instructions.
- Mark your fabric at the pleats.

- Place pocket lining and outer fabric Right Sides Together (RST).
- Pin at the pleats, and around the outer edges. Notice that my pleats are marked by pins of a different color.


- Beginning at Marked Pleat pin, sew around the outside circumference of the pocket with a 1/4" seam. End at the Second Pleat Pin.


- Clip the corners


- Turn the pockets through the hole, between the pleat marks, right side out.
- Smooth out the sides and poke out the corners, Press
- Fold pleats at line and pin in place.

- Topstitch TOP of pocket. If skipping pocket placket like I did, backstitch at pleat to be sure it will stay in place, then continue sewing across top of pocket. I topstitched mine at 1/4" so that the topstitching would match the seam when I sewed the pocket to the tunic. Two lines of stitching, one at 1/8 and one at 1/4, would be pretty, here, as well :)
- Pin pocket in place on tunic front, matching dots.

- Try the tunic against yourself at this point. Check that you do, indeed, want pockets in this exact place. Notice that I have moved mine...
- If you have extra stomachage that you wish to conceal, place the pockets closer together. If you're looking for the waif look, place them farther apart.
- Extra special FYI... if you, ahem, have delicious bosoms that happen to be different sizes than each other, this will effect how the final garment hangs on you, and will make your pockets fall in a different place than you think. For instance, if you're me, one of the pockets will fall dead center on the tunic front... and the other will be lost off to the side somewhere. Go ahead and wonder clip the tunic back and front together and gently wiggle into it. Pin the pockets where you think they can't possibly be a problem. Gently wiggle out, taking care not to stab yourself with the pins! Or just unclip the wonder clips, lol :)

- OR, you can make a large apron style pocket across the front which would not only be super handy, but cute as heck!
Sew the Tie
Sew as per the instructions. I used contrasting thread so that you can see what I'm talkin about.
Sew the Front Darts


- I back stitched at the top and bottom of my darts, cause, honestly, they have a lot of work to do!

- What I would CHANGE: I inserted the tie into the middle of the dart... because I forgot to check for the marking. From now on, I will insert it into the top of the dart, where the marking is, as that will give me an Empire waist look, and also work better to control the extra fabric from the back... See how mine has extra fabric under the arm? I may add elastic across the back of the tunic to make up for my bone-headedness. Try on your garment and mark where you would like YOUR tie to go. If you look at the pic on the pattern package, the tie is high up in the dart. Your final product will come out looking exactly like the pattern, if you follow the instructions. Nice!!

Sew the Shoulders

- Top-stitch on either side of the seam

- I pinked my seam allowances with shears. I hear there are rotary cutter pinking blades. That would work wonderfully on this pattern!
Sew the Neck

(Hint: Tuck the ties into a pocket to keep them out of the way :) Otherwise, I guarantee you, you'll sew them into a seam!)
- Following @Happyzombie's tutorial over on Instagram, I chose not to bias tape my neck edges. Cause I'm lazy. Or a rebel.
- If you sew the neck in this way, it will make for a LARGER SCOOP... Just letting you know, as it increases the way the sleeve hangs from the shoulder...
- Clip the neck edge slightly less than 1/4", ALL of the way around the neck, shoulder, neck.


- Fold over again, and press, holding in place with wonder clips (pins'll stab you as you go around sewing the neck)

- Sew neck down, topstitching along edge farthest from the neck hole.
Sew the Sleeve tops
- Try Frock on, marking where you want the sleeves to meet the sides.
- Fold fabric over 3/8", between your marks, or the original marks from the pattern. Clip every inch or so along curve. Press.


- Sew a 3/8" seam, then topstitch. I've used contrasting thread so that you can see, here.
- Pink the seams so they don't ravel. Oops!


Sew the Side Seams
- Pin at marks.
- Sew beginning at underarm mark.
- I didn't french seam my seams. I just pinked them... lazy lazy lazy. Or efficient, as I didn't have to worry about how to get the underarm seam to look decent this way ;0
Sew the Hem
- Fold the hem up 1/2", press.
- Fold up 1/2" again, press
- With the garment inside-out, Top-stitch 1/8" from top of fold. I started and ended at a side seam so that I could back stitch without it being obvious. Make sure that you want your hem to be 1", if not, adjust the size of your seam, accordingly.

I think I hemmed mine at 2", which is too short to wear with leggings... at least for me!


I can't wait to make the dress length! I think it will flow more nicely, and be super comfortable in linens.
For more info on the Dottie Angel Frock, follow Dottie Angel on Facebook, and check out:
Happy Zombie - I adore this girl!
The House on Hill Road - Instructions on how she made her Frock. She did all of the stuff you're supposed to do a la the pattern. Her frock is stunners!
Christine Haynes - Cutie!!
Pleasant View School House - Two fabulous versions
I am making at least two more Dottie Angel Frocks, in the dress length. They are addicting!! Please do let me know if you make one, I'd LOVE to see it!
XX!
Lori
Linking up with Crazy Mom Quilts for Finish It Up Friday. Woo!!

This turned out fabulous! Super cute! I love it! Liberty pockets too... so awesome! Could I add any more exclamation marks? I must check out this pattern.
ReplyDeleteVery impressive. It looks like you had a lot of fun sewing it.
ReplyDeleteYou look adorable!
ReplyDeleteyou are looking so incredible in this frock dress with the combination of black and white. Thanks for sharing this tutorial on frocks. This blog is really so awesome to read.
ReplyDeleteGood job, i like your dottie angel tunic
ReplyDeleteInteresting about where you put your ties. I've been looking at recommendations for altering the dress, and several people mentioned that they moved the ties down for a more flattering look.
ReplyDeleteLove to know which instructions you followed. Certainly not the one supplied with the same pattern that I got.
ReplyDeleteA vintage-inspired frock sounds delightful.
ReplyDelete