Welcome to SewPsyched!!


 Flip Triangle Template A point down and cut next triangle immediately adjacent to first triangle,proceeding across the strip, flipping and cutting as you go.
Layout units in the form of the finished block. Beginning with corner units, sew all identical units for the block.
Today concludes the Fabri-Quilt New Block Blog Hop 2015, where more than 60 bloggers bring you unique quilt block designs for FREE!! Make sure to stop by all of the blogs listed at the end of this post to get your free patterns, and enter the giveaways!
My block is Modern Dogwood. I hope you like it!!
Each of the bloggers on this hop were generously given 6 Fat Eights of Prairie Cloth Cotton Solids by Fabri-Quilt, and challenged to make a 12 1/2 x 12 1/2" block (12x12, finished size). I chose to use all 6 colors as a personal challenge to stretch myself and my design skills.

The Watermelon Summer bundle includes Chartreuse, Turquoise, Coral, Aqua, Lapis Blue, and White. Such delicious and evocative colors!

And in real life,

I cannot wait to make this into a quilt!!! If you choose to make a quilt top, check on back for full details on fabric requirements, and block sizes.
Here are a couple of layouts I think you might like :)
When you put Modern Dogwood together with just one background color, you get a secondary pattern of a new flower with a pinwheel center. And who doesn't need pinwheels flirting in their garden??!

OOH! What about fussy cutting some cuties flying kites for those centers?? Or perchance a Unicorn or two??
Or how about with Midnight Blue flowers, and one background color?

Or check out the two color background option!

Notice how the secondary patterns really emerge? I like how the aqua makes circles and the chartreuse pinwheels spin away in their flowers. Fun!!
Tutorial:
Materials for one block:
(1) fat Eighth of each of 6 different colors. I used the entire watermelon fat 8th for each block, and half or less of each of the other colors.
Aurifil 2600 for piecing
Templates (at the end of the post)
Step 1: Prep
- Wash and press all fabric before beginning.
- Print, and cut out templates. You may wish to glue them to card stock if you're planning on making more than one block.
- Print out outline block and color in the sections of the block so you know where each unit goes
- Label A, B, C and D templates with the number of each color that you will be cutting.
Step 2: Cutting
Using Templates A,B, C, D and E,
Chartreuse - 4(A)
Lapis - 1(E)
Turquoise - 4(B)
Aqua - 4(B), 2(D)
White - 4(A), 2(D)
Coral - 8(C), 4(D)
- Below, I will show how to fold F8ths to get the number of cuts necessary for each template, in order to make 4 blocks at once.

Template D

Flower Petals (Coral) Templates D and C, folded in half and again (4 layers)

Template B


Step 3: Sewing Units
 Beginning with corner units, sew all identical units for the block.
Line up chartreuse and white A triangles at your machine and chain piece all of them in pairs.
 Press, with a dry iron, toward the Dark Side


Sew the Curved Petal blocks


**You may wish to increase your stitch length to 3.0, and use an edge stitch foot

 Fold curved unit, WST, and crease to mark the center of the curved edge,


 Pin beginning of curved edge, about 1/4" in,
 Needle down in fabric, and PULLING THREADS to keep your fabric from sucking down into your machine, sew up to your first pin,
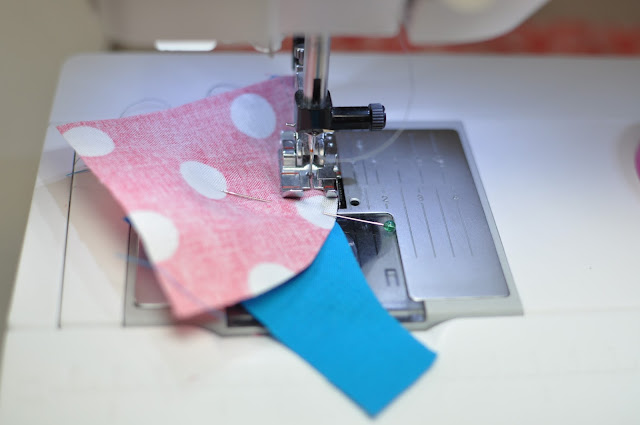 Remove pin and sew to within 1/2" of center pin. STOP with your needle down. Remove pin.
 Bring ends of curve together and pin 1/4" in from end, making sure that edges are even. Continue to sew along edge stretching fabrics so that edges meet, guiding fabric throughout.


 Sew White Triangles,
 Press towards center block.


 Assemble side units into one strip, pressing towards the center, and pressing center seam toward dark fabric.


A jillion thanks to our wonderful advisors and organizers, Yvonne @ QuiltingJetGirl, Stephanie @Late Night Quilter , Cheryl @Meadow Mist Designs and Terri Ann @Childlike Fascination ! Stop by their blogs to enter the giveaway of HALF YARDS of the Watermelon Summer fabrics!! Woo!!
I would also like to sincerely thank Fabri-Quilt for sponsoring this blog hop and so very generously giving more than 62 people free 6 packs of fat eighths. Won't you stop by their blog and see more of what other folks are up to?? Don't forget to enter the giveaway, there, too!!
(psst!! You will be seeing Stephanie on QNN soon!! Wowie!)
2015 Fabri-Quilt New Block Blog Hop Schedule
Wednesday, September 2nd
Thursday, September 3rd


Fold the Arch unit, RST, finger press to mark the center of the inside curve

Match centers, RST, and pin at center


Smooth and even!
Sew Center Unit


Add Aqua D Triangles. They will align exactly with the outside edges of the White D Triangles. Press toward Aqua.
Step 4: Assemble Block
Lay out units in columns,


Assemble center section, pressing seams toward outside edge.
Sew sections together, nesting side seams, and pinning. Press all seams towards outside edge of block. Do not stretch block, simply press firmly.


Yay! Modern Dogwood!!
I would also like to sincerely thank Fabri-Quilt for sponsoring this blog hop and so very generously giving more than 62 people free 6 packs of fat eighths. Won't you stop by their blog and see more of what other folks are up to?? Don't forget to enter the giveaway, there, too!!
(psst!! You will be seeing Stephanie on QNN soon!! Wowie!)
2015 Fabri-Quilt New Block Blog Hop Schedule
Monday, August 31st
Host – Yvonne @Quilting Jetgirl
Kelly @Quilting it Out
Martha @Once a Wingnut
Irene @Patchwork and Pastry
Cassandra @The (not so) Dramatic Life
Andrea @The Sewing Fools
Bernie @Needle and Foot
Silvia @A Stranger View
Wanda @Wanda’s Life Sampler
Sandra @Musings of a Menopausal Melon
Vicki @Orchid Owl Quilts
Jess @Quilty Habit
Diana @Red Delicious Life
Chelsea @Patch the Giraffe
Margo @Shadow Lane Quilts
Renee @Quilts of a Feather
Tuesday, September 1st
Host – Cheryl @Meadow Mist Designs
Colleen @Colleen’s Custom Quilting
Josi @Avocado Quilts
Cindy @Sewing Moxie
Stephanie @Quilt’n Party
Cristy @Love You Sew
Sarah @Sarah Goer Quilts
Shelly @The Carpenter’s Daughter Who Quilts
Jayne @Twiggy & Opal
Sharla @Thistle Thicket Studio
Adrian @Making It – Family Food Quilts Crafts
Julie @Pink Doxies
Sarah @123 Quilt
Deanna @Stitches Quilting
Jane @Jolly and Delilah Quilts
Carrie @The Zen Quilter
Wednesday, September 2nd
Host – Stephanie @Late Night Quilter
Hannah @Modern Magnolia Studio
Cindy @Stitchin At Home
Abby @Hashtag Quilt
Lisa @Sunlight in Winter Quilts
Carrie @Chopping Block Quilts
Eleanor @Cat Approved Quilting
Brianna @The Iron and Needle
Tish @Tish’s Adventures in Wonderland
Jan @The Colorful Fabriholic
Sarah @Smiles Too Loudly
Beth @Cooking Up Quilts
Leanne @Devoted Quilter
Liz @LizzyClips Design
Kim @Leland Ave Studios
Kitty @Night Quilter
Thursday, September 3rd
Host – Terri Ann @Childlike Fascination
Robyn @Hoops & Thimbles
Helen @Midget Gem Quilts
Jinger @Trials of a Newbie Quilter
Anja @Anja Quilts
Kathryn @Upitis Quilts
Mary @Quilting is in my Blood
Emma @My Handmade Home
Francine @Mocha Wild Child
Dina @Living Water Quilter
Deb @The Farmhouse Quilter
Lori @SewPsyched!
Amy @13 Spools
Denise @CrafTraditions
Sandra @The Bias Edge


XX!!!
Lori

I really like seeing how well solid quilts / quilt blocks compare to the design sketches. It is almost hard to tell which is the design and which is the block in the images at the top of your post! I really like the curved piecing that you introduce in your block, and the outer edge of the quilt really looks like beautiful buds to me. :)
ReplyDeleteGorgeous design! It does look like dogwood flowers! The combination of curves and straight lines, and commonly used blocks (HST, drunkards path, etc.) but in a new arrangement, works quite well. I'm bookmarking this for sure!
ReplyDeleteGreat combination of all the square, HST and curved. Really neat block. Thanks.
ReplyDeleteWhat a lovely block design. The curves add a great visual impact I love this block.
ReplyDeleteYour block is beautiful but the design you put together for a whole quilt is amazing!
ReplyDeleteNice block! My favorite, I think, is the blue one. I enjoy making the drunkards path block without pins- which is facilitated by the GO! dies which cut so perfectly. So I'm thinking you use EQ7?
ReplyDeleteYour block reminds me of a cute little potty that my children used to use when they were little. But your potties are so pretty :)
ReplyDeleteSandra
HAHAHAHA!!! So true!!! And my Sis thinks it looks like the flower on the original Star Trek, that puffs Kirk and Spock!! Lollllll!! I cover all of the genres!
DeleteYour block is beautiful! I've never tried sewing a curved seam before, but I think you did an excellent job of showing how it is done. Great job!
ReplyDeleteVery cool! One day when I am brave enough to try curved piecing, I will have to give this a shot.
ReplyDeleteLove, love this block! How amazing it is! Great tutorial... you killed it!
ReplyDeleteSuch a great block and I love the secondary patterns it creates in a quilt. Your photos and directions were really clear.
ReplyDeleteThat's super cute!! Thanks for sharing :)
ReplyDeleteCool block and love that you use that glue stick!
ReplyDeleteI have them in every pocket and every drawer!! So handy for so much in the sewing room!
DeleteI have them in every pocket and every drawer!! So handy for so much in the sewing room!
DeleteThat is a Wow block, thanks for the wonderful tutorial on sewing curves.
ReplyDeleteGreat tute! I love that you also shared the color variations!
ReplyDeleteThis is a very cool block Lori! Love it! I especially love the secondary patter with the stripes in the background.
ReplyDeleteVery creative block. Job well done!
ReplyDeleteThis is a fun block and a nice assortment of layouts. I like the details and photos of your tutorial. Well done!
ReplyDeleteWhat a cool block - I love the round shapes. And the alternate layouts are great too - the third one is my fave. Great use of your skills and imagination.
ReplyDeleteThat looks so intricate, I love it! Of course the curved piecing scares me a bit but the layouts look awesome.
ReplyDeleteLove this one too, you showed how to make those curves go easier. Thank you. crystalbluern at onlineok dot com
ReplyDeleteI love your Modern Dogwood block that you have created and your tutorial is excellent! I have bookmarked this block and plan on making a quilt. Thank you so much for sharing your creativity and inspiring with your layouts. I hope that you have a wonderful creative day!
ReplyDeleteSo beautiful.Great design and love all the layout!
ReplyDeletecongratulations sis! Youve got a winner here!
ReplyDeleteOh my goodness, Lori, this is an amazing and terrifying (to me!) block that I absolutely need to try making, maybe not for awhile, but I plan to come back to this tutorial down the road. It is on my quilting bucket list. You have outdone yourself!!! Take care, Mary.
ReplyDeleteThank you Lori, for the keen looking block and your detailed instructions. This block will make a fantastic looking quilt.
ReplyDeleteFun block with all the curves and variations of colors you've shown! I tried several methods of sewing curves before I found one that worked best for me, so I encourage people to not give up just because there is curved piecing involved.I like the no pin method lifting the top piece up, and feeding gently at a curve as it goes under my presser foot. There's a sucessful way for everyone I've met so far. Thanks for the inspiration today.
ReplyDeleteI love the secondary pattern. Great block!
ReplyDeleteThis block is so fun and beautiful! I love the curves, they really do remind me of flowers. Great tutorial, thanks!
ReplyDeleteThis is a very pretty block Lori. I like the combination of straight and curved piecing. I love the first layout. It's very pretty.
ReplyDelete