Welcome to day three of the
2016 Paintbrush Studios New Block Blog Hop!!


2016 Paintbrush Studios New Block Blog Hop!!

Today, I have my Parisian Tiles Block pattern using Paintbrush Studios lovely Ocean Sunrise inspired theme.

These lovely Painter's Palette fabrics were provided to us by Paintbrush Studios, to make 12 1/2" blocks with. These blocks will all be sent back to Yvonne, Quilting Jet Girl, who will assemble them into several quilts for charity. How awesome is that??!! There is also a fabric giveaway, so hop on over and win yourself some love!

What reminds you more of Ocean's and Summers than a Nautically inspired quilt???

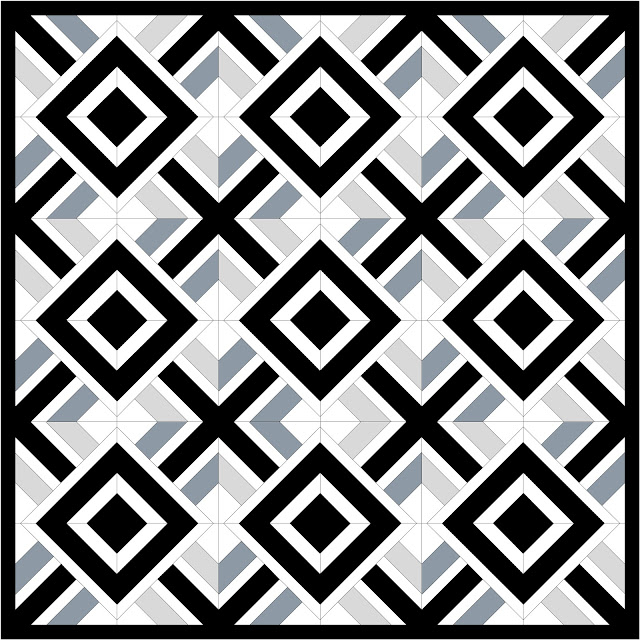
Meet Parisian Tiles, my 12" finished block.

Parisian Tiles makes up into a lovely Queen sized quilt with only 12 blocks!! Quick and easy for your Summer time decor!
You will need:
a FQ, each of:
a FQ, each of:
Daydream
Midnight
White
Supplies:
Starch to stabilize bias blocks
A 12 1/2" Square ruler to square up your block
Rotary cutter, mat, Aurifil 50 thread in 2600, grey
80/12 needle
Cutting: (WOF is width of fabric, in this case, a fat quarter or 21")
White fabric;
(3), 2" WOF strips
(1), 4" WOF strip, subdivide into 4" Squares
Daydream fabric;
(1), 3" WOF strip
Midnight fabric;
(1), 4" WOF, subcut into 7 1/2" lengths
(2), 3" WOF strips
Left Half of Block:
Requirements:
(2), White 4"squares
(1), Midnight 3" by 9" strip
(2), White 2" by 9" strips
(2), Daydream 3" by 7" strips

Assemble Left Half of block as above:
- White square, Daydream strip, White strip, Midnight strip, White strip, Daydream strip, White square
- NOTE: Notice that the strips are all sewn from the same leading edge so that the bottom of the edge is straight. If your edge is not straight, rip and repiece. If your edge is almost straight, with less than 1/8" variation, it will be fine, as this edge will be in the seam when we combine the two sides of the block.
- PRESS all seams in one direction, using starch and no steam. The starch will help to stabilize the block as we piece the two sides together.
- While hot from pressing, place the block under a heavy book to ensure super flatness.


Let's Trim!!
- Using a 12 1/2" Square Ruler, place the center line 3/8 of an inch from the bottom, straight, edge, as seen above.

- Center top edge (at 12 1/2" corner) in the Midnight strip, maintaining the bottom edge of your block on the center line.

- Holding ruler in place, trim both sides.
Right Half of block:
(1) White 2" by 21" strip
(1) Midnight 3" by 16" strip
(1) White 2" by 11" strip
(1) Midnight 4: by 7 1/2" strip
Assemble Right Half of block:
- Mark the centers of each strip using a pin or by folding and finger pressing
- Match the centers and pin, beginning with the White 2" by 21" strip and following the order, above. Sew in sequence
- Press, using starch, and no steam, and weight to lie flat.

Trim the block:
- Line the center line of the 12 1/2" ruler 3/8" from the bottom (long White edge) of the block, as above.
- Align the point of the corner of the ruler, with the center of the Midnight strip, as above.
- Trim along both sides.

Assemble the Block:

- Line the two halves of your block, longest hypotenuse, together,

- Keeping bottom, long, edges together, sew with a 1/4" seam, attending to seams so that they do not flip while sewing.
- Press, folding seam to the long white strip
Trim the block:

- Align the center line of the 12 1/2" square ruler with the center seam you just sewed.
- Trim the block around the outside edge of the entire ruler.
Repeat 11 more times and you have a quilt flimsy!! Wooo!!
For added zest, you can change up the colors to make the quilt 3D!!


Please check out the other Bloggers' Patterns!!!
Wednesday, March 30th

Loove it!
ReplyDeleteUSA UK CANADA FRESH FULLZ SELL
DeleteSSN NIN SIN Info with all other details
Bulk quantity available & fresh database
Verified & Legit Info guaranteed
Tele Gr@m > @ leadsupplier , @ killhacks
What's App > (+1).. 727..... 788.... 6129..
Skype > @ peeterhacks
E mail > hacksp007 at g-mail dot com
FULLZ DESCRIPTION:
SSN DOB DL ADDRESS USA FULLZ
SIN DOB ADDRESS MMN PHONE EMAIL CANADA FULLZ
NIN DOB DL ADDRESS SORT CODE & ACCOUNT NUMBER UK FULLZ
High Credit Scores pros Fullz (700+ scores)
Young & Old age fullz (2009+ & 1960 below)
Real|Original DL|ID scan front back with selfie
DL Scan front back with SSN USA
CC with CVV Fullz
Dumps with Pin 101 & 202 with tutorials
TOOLS AVAILABLE:
SMTP|RDP|SHELLS|C-panels
Web-mailers|SMS Bomber|Bulk Email Sender
Carding Tools & Tutorials
Sc@m Pages & Sc@m page scripting
Sp@mming Tools & tutorials with leads
All genuine stuff will be provided
Available 24/7 on all time zones
Crypto Payments accepted only
Discounts available for bulk info buyers
#SSN #SSNDOBDL #SellSSN #CCShop #CCSELLCVV #ShopSSNDOBDLADDRESS #FULLZ #SSNFULLZ
#REALDLSCAN #YoungAgeFullz #Fullzseller #USAFULLZ #FULLZUSA #SellerSSNDOB #ShopSSNDOB
#BusinessFullzUSA #USAPros #USALeads #EINFullz #taxreturn #W2form #HighCSPRos #HighCreditFullz
#ReturnFilling #UberEatsFullz #DoordashFullz
A gorgeous block! Love the quilt design!
ReplyDeleteLove your Persian Tiles block!!!
ReplyDeleteVery graphic! I like it. :)
ReplyDeletethis is a fun and simple block. thanks so much for sharing. i like the idea of this as a summer quilt.
ReplyDeletequilting dash lady at comcast dot net
I love the block, especially in the neutral colors! Nothing better than a bold graphic design! Thank you!
ReplyDeleteI really love how this design comes together, Lori. The fact that it gives a quilt a 3D effect is fantastic. Thank you so much for joining the hop!
ReplyDeleteGreat design...it sings!
ReplyDeleteLike the 3D look.
ReplyDeletePretty block! It looks great in the quilt layout.
ReplyDeleteSimple but effective! This is a fantastic block. Great tutorial!
ReplyDeleteVery striking block and makes a very graphic quilt. Great job!
ReplyDeleteSo beautiful.Great job!
ReplyDeleteneat oh! I need a nautical quilt~!
ReplyDeleteI think you'll be getting one! Or three!! 💙💙
DeleteThis is my kind of quilt!!!
ReplyDeleteThat is really awesome. I think I may just get going on it.
ReplyDeleteGreat block. It's been fun seeing all the different blocks.
ReplyDeleteOooh, I love this block! It has such a 3D quality to it. It's beautiful.
ReplyDeleteThis is so cool Lori!!! I love the 3D effect. Very clever and looks amazing!
ReplyDeleteLakers Basketball Live
ReplyDeleteClippers Basketball Live
Rockets Basketball Live
USA UK CANADA FRESH FULLZ SELL
ReplyDeleteSSN NIN SIN Info with all other details
Bulk quantity available & fresh database
Verified & Legit Info guaranteed
Tele Gr@m > @ leadsupplier , @ killhacks
What's App > (+1).. 727..... 788.... 6129..
Skype > @ peeterhacks
E mail > hacksp007 at g-mail dot com
FULLZ DESCRIPTION:
SSN DOB DL ADDRESS USA FULLZ
SIN DOB ADDRESS MMN PHONE EMAIL CANADA FULLZ
NIN DOB DL ADDRESS SORT CODE & ACCOUNT NUMBER UK FULLZ
High Credit Scores pros Fullz (700+ scores)
Young & Old age fullz (2009+ & 1960 below)
Real|Original DL|ID scan front back with selfie
DL Scan front back with SSN USA
CC with CVV Fullz
Dumps with Pin 101 & 202 with tutorials
TOOLS AVAILABLE:
SMTP|RDP|SHELLS|C-panels
Web-mailers|SMS Bomber|Bulk Email Sender
Carding Tools & Tutorials
Sc@m Pages & Sc@m page scripting
Sp@mming Tools & tutorials with leads
All genuine stuff will be provided
Available 24/7 on all time zones
Crypto Payments accepted only
Discounts available for bulk info buyers
#SSN #SSNDOBDL #SellSSN #CCShop #CCSELLCVV #ShopSSNDOBDLADDRESS #FULLZ #SSNFULLZ
#REALDLSCAN #YoungAgeFullz #Fullzseller #USAFULLZ #FULLZUSA #SellerSSNDOB #ShopSSNDOB
#BusinessFullzUSA #USAPros #USALeads #EINFullz #taxreturn #W2form #HighCSPRos #HighCreditFullz
#ReturnFilling #UberEatsFullz #DoordashFullz